 271
271
- Place the Original Document in Feed Tray or Directly on Scanner
- Press Copy on Screen
- Enter the Number of Copies Using the Numeric Keys on the Copy Feature Screen
- Specify the Copy Settings as Necessary
- Color or Black and White
- Enlarging or Reducing (See More Below)
- Selecing Copy Paper
- 2-Sided Copying (See more Below)
- Adjusting Image Quality of Copies
- Specifying the Orientation of the Original
- Press the
 (Start)
To cancel copying, press <Cancel> or  (Stop).
Pressing  or
or  during copying enables you to adjust density.
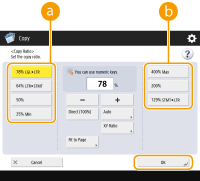
Enlarging or Reducing
1. Press <Copy Ratio>.
2. To reduce, select the copy ratio from  , to enlarge, select the copy ratio from
  , and press <OK>.

2-Sided Copying
|
|
|
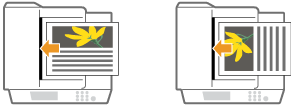
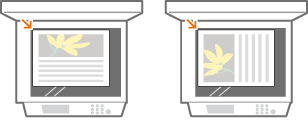
Place the original in a proper orientation as shown in the illustrations below.
Originals of heavy or thin paper cannot be placed in the feeder. Place the original on the platen glass. In this case, place the original in a proper orientation as shown in the illustrations below.
When making 2-sided copies, functions of some settings such as the paper size and type are limited. |
Copying 1-Sided to 2-Sided
When copying a horizontally long original, place the original in landscape orientation.
1. Press <Options>  <2-Sided>.
2. Press <1-Sided ![]() 2-Sided>.
2-Sided>.
3. Set <Finishing Copy Format> and press <OK>.
To change the print orientation, press <Set Details>. Select <Book Type> to make the front and back sides of the printout have the same top-bottom orientation. Select <Calendar Type> to make the front and back sides of the printout have opposite top-bottom orientations.
Copying 2-Sided to 2-Sided
1. Press <Options>  <2-Sided>.
2. Press <2-Sided ![]() 2-Sided>.
2-Sided>.
3. Set <Original Type> and <Finishing Copy Format>, and press <OK>.
To specify orientation of the original and change the print orientation, press <Set Details>. Select <Book Type> when the front and back sides of the original have the same top-bottom orientation. Select <Calendar Type> when the front and back sides of the original have opposite top-bottom orientations. You can also set the page orientation of the printout with <Book Type> or <Calendar Type>.
Copying 2-Sided to 1-Sided
Place the original in the feeder.
1. Press <Options>  <2-Sided>.
2. Press <2-Sided ![]() 1-Sided>.
1-Sided>.
3. Set <Original Type> and press <OK>.
To specify the orientation of the original, press <Set Details>. Select <Book Type> when the front and back sides of the original have the same top-bottom orientation. Select <Calendar Type> when the front and back sides of the original have opposite top-bottom orientations.


