 275
275
Print a Worksheet or Workbook
Before you print
Before you print anything in Excel, remember that there are many options available for an optimal print experience. For more information, see Printing in Excel.
Important: Some formatting, such as colored text or cell shading, may look good on the screen but not look how you expect when it prints on a black-and-white printer. You may also want to print a worksheet with gridlines displayed so that the data, rows, and columns stand out better.
Print one or several worksheets
-
Select the worksheets that you want to print.
-
Select File > Print, or press CTRL+P.
-
Select the Print button or adjust Settings before you select the Print button.
Print one or several workbooks
All workbook files that you want to print must be in the same folder.
-
Select File > Open.
-
Hold down CTRL click the name of each workbook to print, and then select Print.
Print all or part of a worksheet
-
Click the worksheet, and then select the range of data that you want to print.
-
Select File, and then click Print.
-
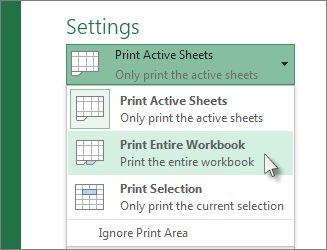
Under Settings, select the arrow next to Print Active Sheets and select the appropriate option.

-
Select Print.
Note: If a worksheet has defined print areas, Excel will print only those print areas. If you don't want to print only the defined print area, select the Ignore print area check box. Learn more on setting or clearing a print area.
Print an Excel table
-
Select a cell within the table to enable the table.
-
Select File, and then select Print.
-
Under Settings, select the arrow next to Print Active Sheets and select Print Selected Table.

-
Select Print.
Print a workbook to a file
-
Select File, and then select Print, or press Ctrl+P.
-
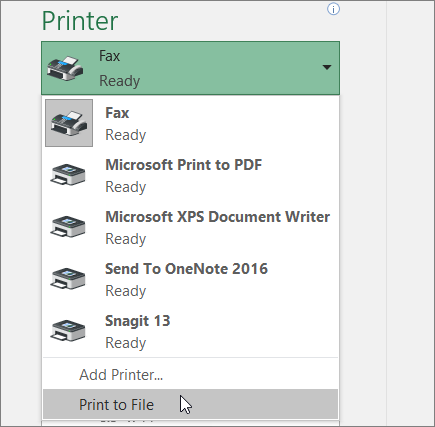
Under Printer, select Print to File.

-
Select Print.
-
In the Save Print Output As dialog box, enter a file name and then select OK. The file will be saved in your Documents folder
Original Article:
Excel Intro Course:


